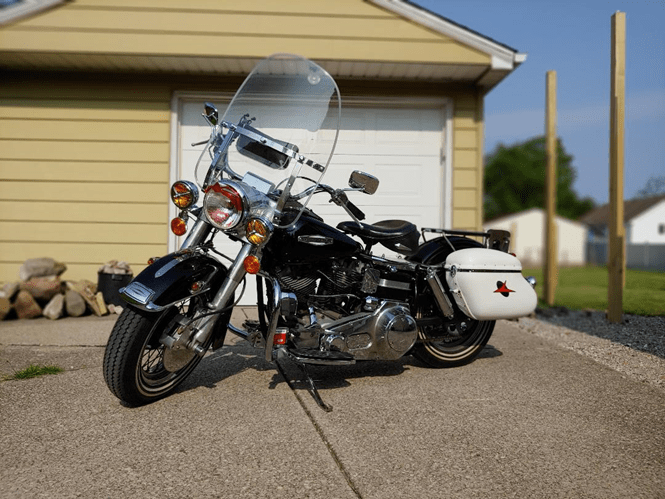
Nothing Happens Fast on a Shovel – Part IV

Goin’ Down Swingin’

The closer I got to finishing this shovel, the more it felt like the bike was fighting me at every single turn. Clearly, it is an inanimate object and cannot actually fight me – or can it? This bike was gonna go down swinging, but I was gonna win. I was gonna ride this damn bike to PA, and that was that. As long as it let me…

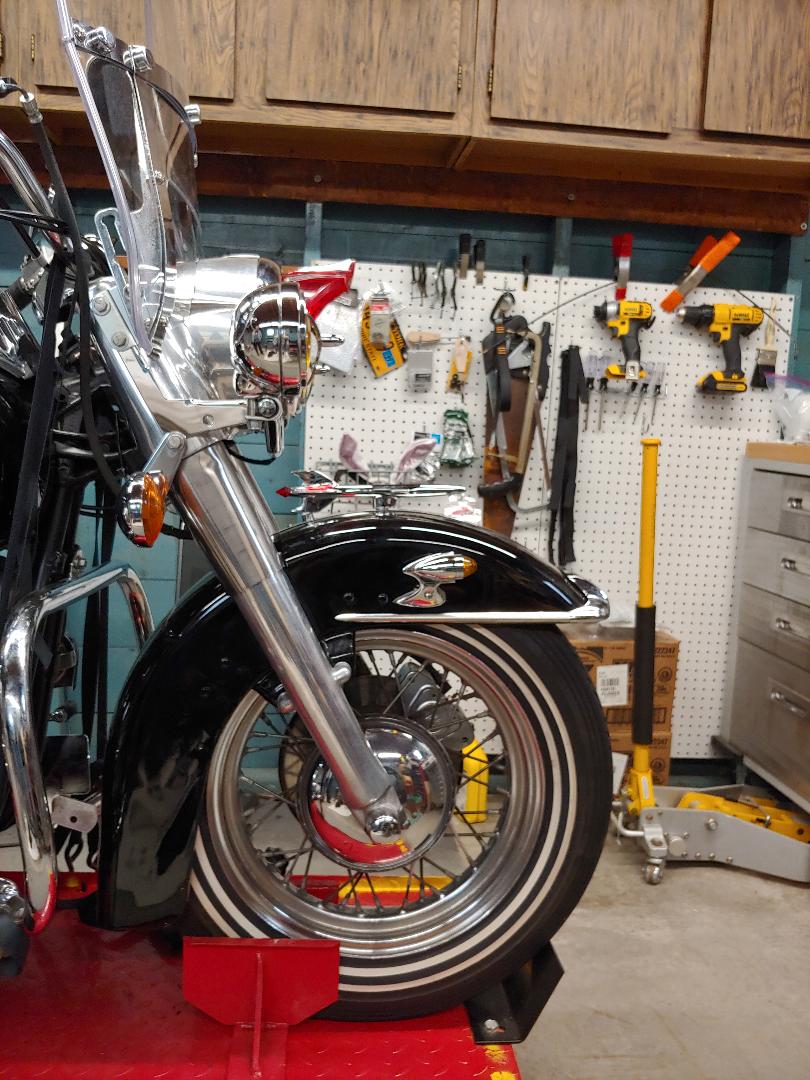
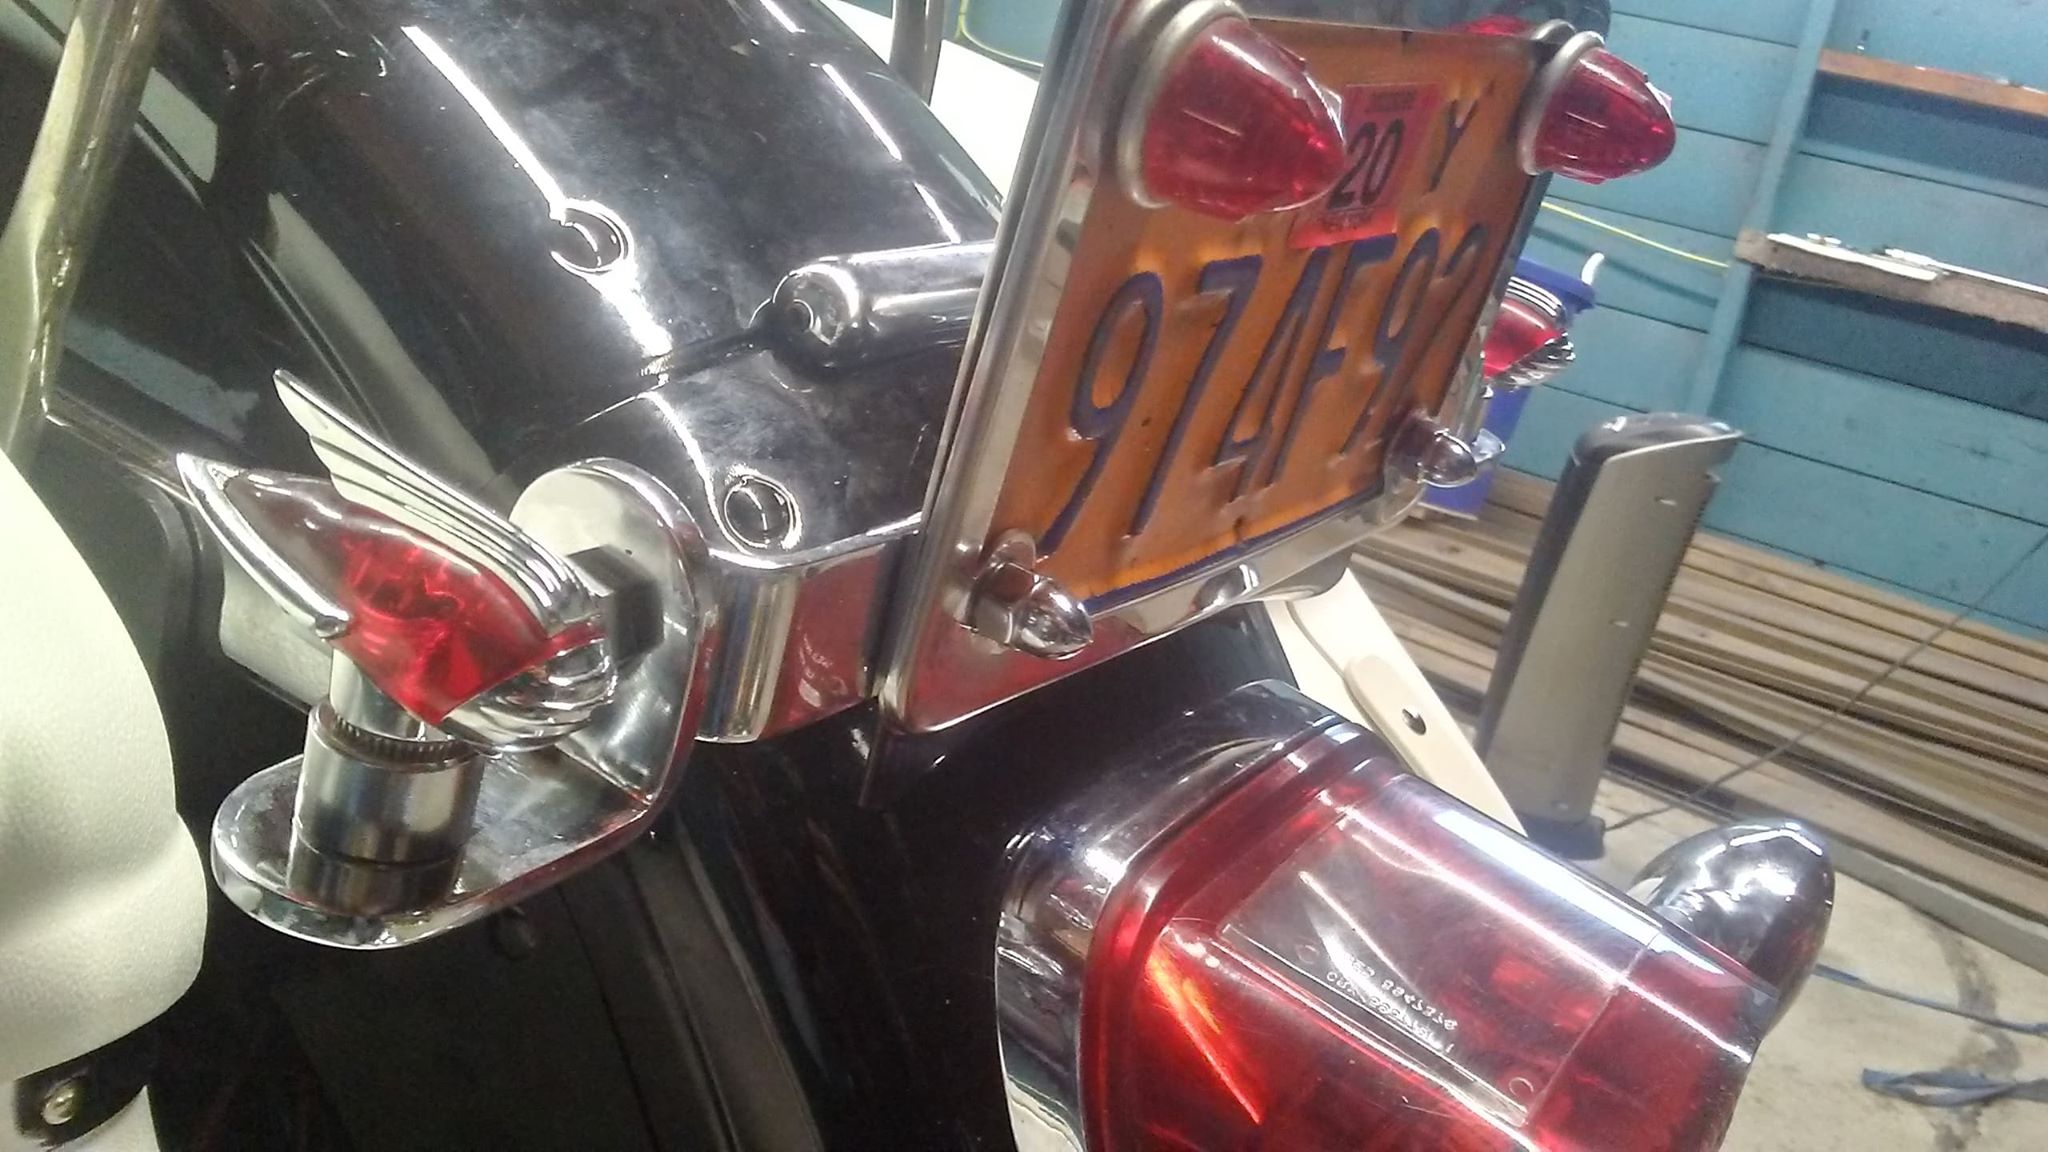
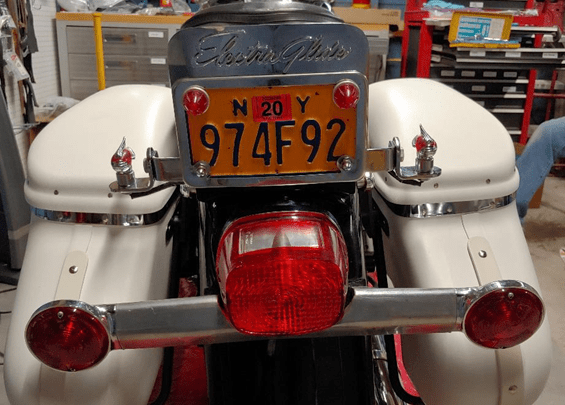
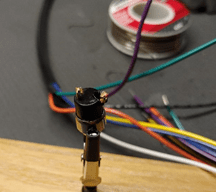
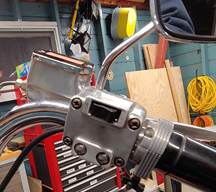
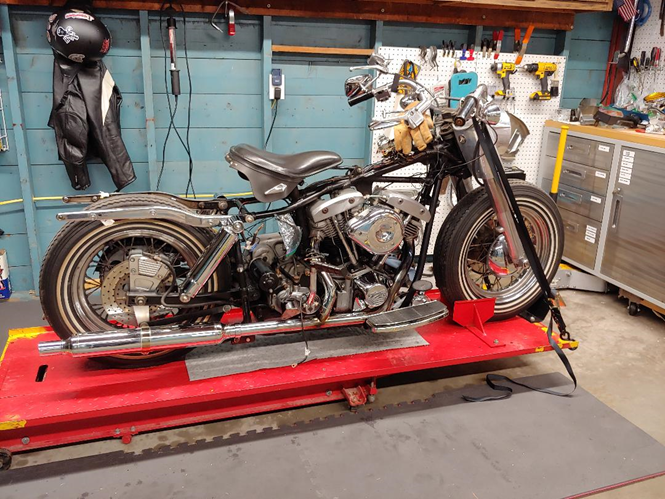
Once I got all the electrical gremlins sorted, I turned my attention to clearance issues I’d discovered with the spotlights and front turn signals. In the trailer, on the way to Dan’s, the bar on the spotlight bracket hit the top of the rocket fender ornament, so it was obvious there was a problem there. Unless you are Dan and already know it, you can’t figure out all your clearances with a bike on the lift, and the bars locked in straight ahead. I also found that where I had the front turn signals mounted, they would hit the front crash bar when I turned the bars all the way right or left.

So Dan ordered the spot brackets, and the stanchions I needed to install the turn signals directly below the spots, on the same bracket. I got those installed, using a nifty deep socket Dan modified to allow you to tighten the spotlight without pinching the wire that comes through the threaded post. If I’d tried installing those lights anywhere but at Dan’s, I would still be trying to get them on.
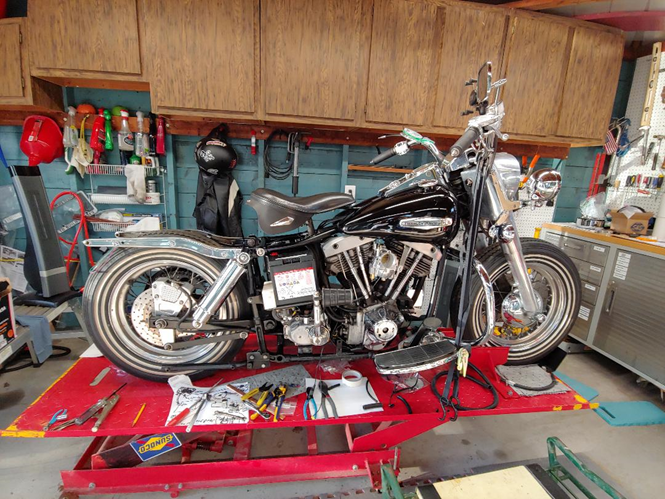
We worked out some other bugs as well. Replaced the socket head cap screws that I initially mounted the saddle bags with because the heads were actually touching the saddle bag lids. The replacement bolts were too long, so I had to grind them down. But they have enough clearance so the lids won’t get ripped up. Calling that a win.

I got some more chrome pieces back on – frame cover beneath the seat, etc.

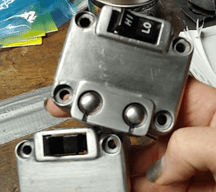
I mentioned that I wished I had a trip odometer reset stem. The trip-o is on the bike, and there was a hole in the side of the dash where, ostensibly, the stem was supposed to go, but the hole had a chrome cap plug in it. Dan had a stem, so he put it on, and when I tried to put the dash on, we found that the hole in the side of the dash wasn’t in the correct location for the stem. Of course. That explains why there was no stem already on the bike. So Dan drilled the dash, and I happened to have a rubber grommet that fit because the chrome cap would no longer work there. I popped the grommet in and filled the hole with silicone – good enough. I now have a working trip-o. Another win.

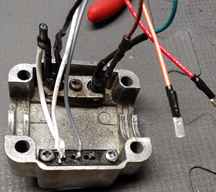
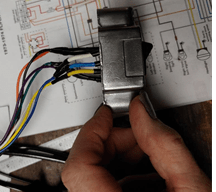
Got the dash on. Then off. Then on. Then off. Still off. Oil pressure light wasn’t working. We discovered that it was not hooked up at all. Not even sure how that happened, but OK… Then discovered that the terminals on the ignition switch are all stripped. Seriously! The shovel was going to fight me to the bitter end. So I had to go off on an expedition to find screws and nuts to finish the ignition switch, put the dash on, finally, and leave it on.
To my surprise, I actually found the microscopic screws and nuts I needed for the ignition switch. OK, they weren’t actually microscopic, but they were 3mm, which is pretty much the same thing. Needed medical forceps to hold them under the switch while I tightened the screws up top, but I got them all in, and everything was nice and snug. 
To fix the oil pressure light – instead of taking the dash off, which is a pain with the tanks on – I just extended the wire and hooked it to the ignition switch. Whatevs. Done. Oil pressure light works. 
Put the coil cover back on, but of course, to do that, had to remove the coil… Again… Put the cover on, and then put the whole thing back on the bike. At season end, I need to pull the two screws that hold that cover on, and replace them with hex bolts. Kinda tough to turn a socket head screw if you can’t get to the end of it. 
Next up was putting the battery cover back on. Simple enough, right? Yeah, no. I was tightening a nut down on one of the bolts, and sheared the bolt clean in two! I am really not that strong. Am I? Fortunately Dan had a spare – it’s a rubber mount with bolts out each side. Not exactly something you can go to the local hardware store and pick up. However… Getting the mount back into position was…. Interesting… But I got it. Win.
The battery box strap needed a mod to accommodate the battery, so Dan took care of that for me later.
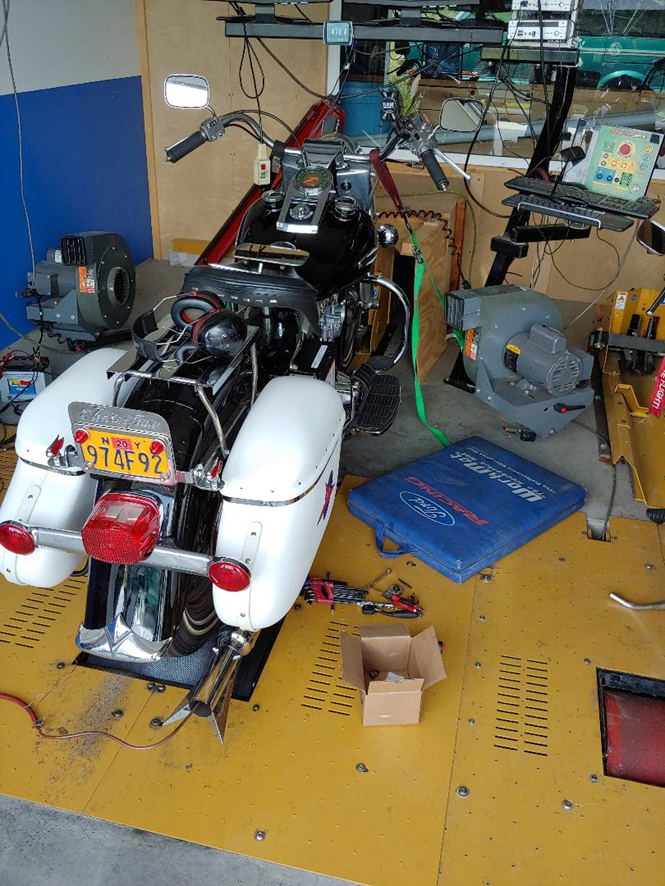
Meahwhile… I put the temporary straps back on the battery because it was finally time to dyno the bike. The day I had been waiting for!!!!!!

Added oil – all good. Added some gas – all good – but needed to reroute one gas line. Got that done with surprisingly little spillage.

Once Dan got the bike on the dyno, he made a couple mods to the Super E, and the bike ran great. It’s got 48-49 hp and tons of torque, just like it should. I didn’t have Dan dyno the bike to make it a screamer. I wanted to make sure the carb was set up correctly. He could probably have done it without the dyno because he’s done so many, but the whole process gave me peace of mind that I never had with the bike before. When I got the bike, it had the S&S Super B on it, and all I did was fight with it. Idled badly, ran badly, fouled plugs, made me crazy.

I bolted up a Super E, Dan tuned it and it’s a different bike altogether. Idles nice and smooth, and with all the torque, pulls like a freight train. Now the carb, motor and exhaust all play well together.

Dyno testing the shovel at Dan’s.

One final adjustment before we put the shovel on the road for a test ride. The clutch. It was adjusted completely backwards from how it should have been. I always wondered why the bike felt like it was going to pull through the clutch any second if I was in gear at a stop. Now I know. Dan showed me how to adjust it correctly, and now it will not do that anymore.
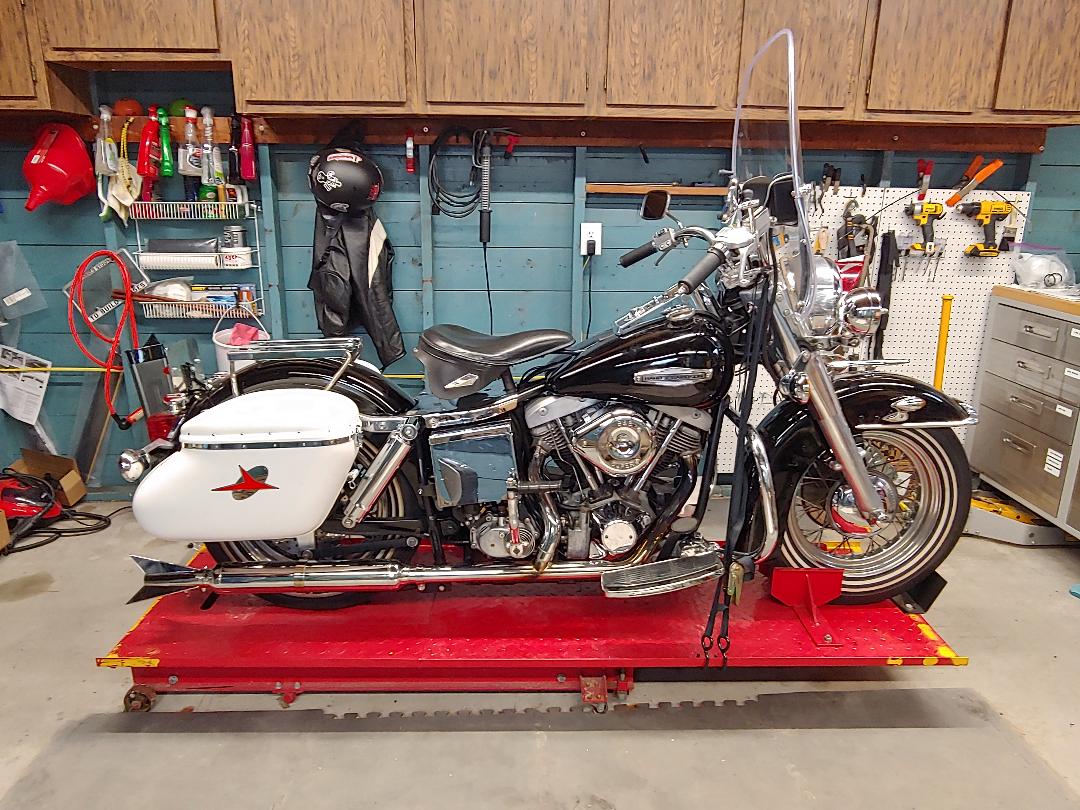
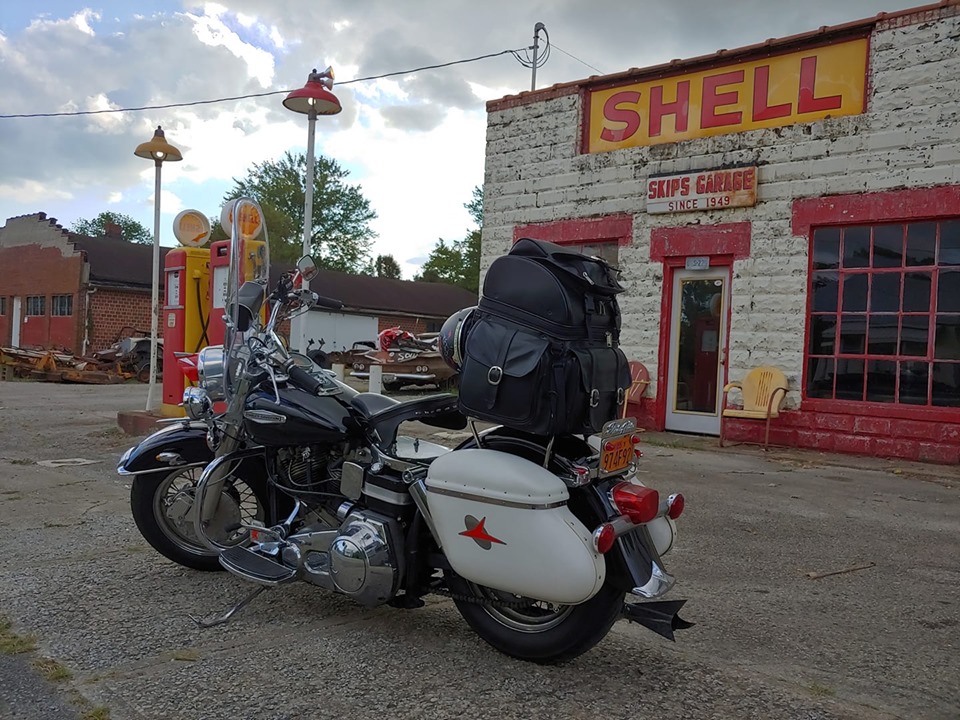
Overall, the bike ran fantastic. With the clutch adjusted, the tranny shifts a lot smoother, and with the carb adjusted correctly, the motor is happy. Finally. I have one or two tweaks on the carb to try, and I think that will put it exactly where I want it. I put about 30 miles on it – not a bad run for a first shakedown ride. I was still waiting for the correct spotlight brackets, so I still couldn’t bring the bike home. But I was so close.
When the spotlight brackets came in, I went back out to Dan’s to get them installed. I was under no illusion however, that this would be a quick, easy install. 
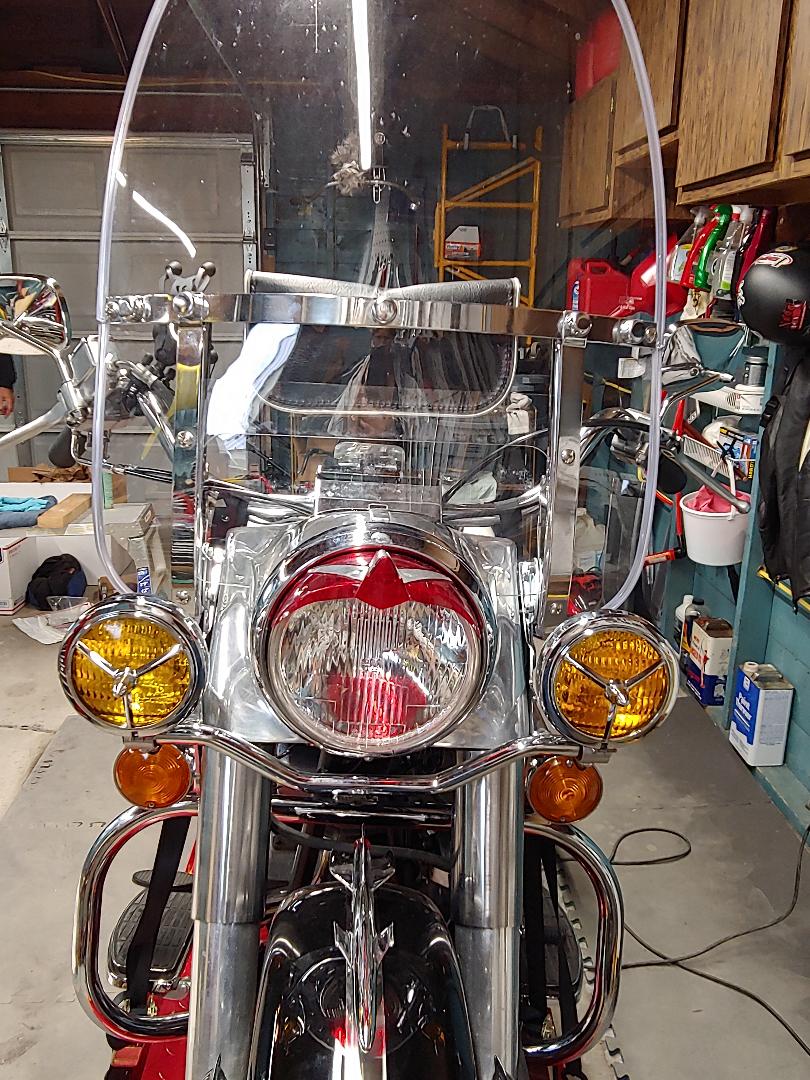
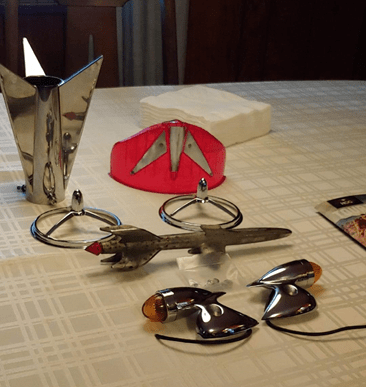
So the brackets. The “pretty side” went toward the inside, never to be seen. The outside, that is seen had a rougher finish, and you can see the spot welds. Seriously. Not much to do about that, so I just put them on. Glory be! They fit! OK, that made up for any lack of finish quality. Win.
Turn signal stanchions. Look great. Came with zero hardware. I am lucky Dan has a lifetime collection of spare (almost) everything, so we found four screws that will work. I still need to replace them because they are black oxide, and they should be stainless. But I can do that later on my own. I just have to remember to have my Allen wrench cut down so I can get those blasted screws in and out.
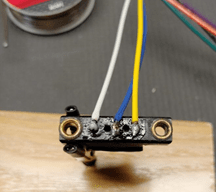
On to the turn signals. Well, with this new bracket/install, the wiring runs a little differently, so I had to rewire the turn signals. The way they were, there was a solder joint right where I needed to be able to bend the wire. No bueno. I prepped everything, and Dan soldered up the little metal contact to the new wire.
Moving to the spots. Well, those came with the bike. And they weren’t really mounted well before. Now that I had to mount them in this configuration, I was missing a critical (and of course, specialized) spacer that would allow the spots to seat properly, and also allow them to be adjusted somewhat. What to do… Well, I think Dan either felt sorry for me, or he wanted me out of his hair…. Regardless, he turned up the 2 pieces I needed on his lathe. This guy is good. Made two identical pieces – never measured a thing. I’ve worked around machinists every day for the last 20 years, so I’m not easily impressed, but Dan is impressive.
So, finally, I got the lighting assembled, but not before I needed a special deep socket that Dan had modified for this specific type of lighting set up, which I mentioned earlier. Without it, I would still be trying to tighten those spots.
I was at a stopping point, so I decided to finish everything up the following day. There wasn’t much left. Heat shrink the spot/turn signal wires, route them to the front block, wire them in, and test. So far, so good. My happy was getting happier. 

It was starting to get dark out, so I put the headlight in, thinking I’d align it once I got the windshield on – it wasn’t dark enough yet – and then finish off with the beauty ring and visor. 
Headlight install – check. Still works – check.
Windshield. So this windshield gets bolted on, using one of the bolts that holds the nacelle, and the spotlight brackets on. It goes into a threaded hole in the triple tree. I hate putting these bolts in and taking them out. They always go in a little hard, and I am constantly worried that I’m going to strip the threaded hole. But, so far, so good. (These previous statements are called foreshadowing….) I got three of four bolts in, so the windshield was on, except this last bolt. I was snugging it down, and it went from snug to loose…and I stripped the hole. OK. Deep breath. Dan checks it. Yep, she’s stripped. Headlight comes back out (also sketchy, as that requires steel screws into aluminum…so many ways to screw up a bike, so little time). Windshield off. Spot bracket off. Took the left side of nacelle off. 
Threaded hole is fine. WHAT???? That left both of us scratching our heads. So, with Dan driving, we replaced each piece, one at a time. Nacelle, spot bracket, windshield. Each time, the bolt held. We are both still scratching our heads… But we locktited that sucker in and had a celebratory adult beverage. 
Another late one, so we called it a night and I arranged to come out the following day to put the beauty ring and visor on the headlight, and ride the Atomic Shovel home.

At this point, I think I simply wore that shovel down. It had no fight left in it the next day, so I successfully finished up the headlight and rode it out of Dan’s shop.

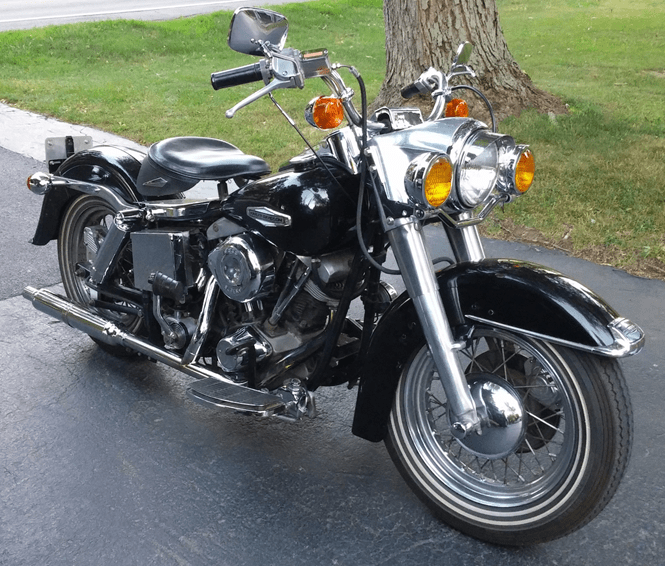
May 31, 2019 6:15 p.m. The shovel was officially done, inspected, and on the road!

The Atomic Shovel. Finally finished and ready for its first AMCA Road Run. Ligonier, PA
There is something about the Atomic Age designs that I love, and it was so fun to incorporate those rocket images into this bike.

Nothing Happens Fast on a Shovel – Part III

Sometimes, the Shovel Wins

So at this point, I had made pretty fair progress – handlebars were done, front block was pretty much done, dash was mostly wired. I was pretty happy, and proud of myself that I hadn’t given up yet. But it wasn’t done yet, either.

This project would be nothing if it weren’t for some of the funny moments – mostly at my expense. Apparently I cannot go more than a week without pulling some sort of stupid human trick. I truly wonder sometimes how I am still alive… I was putting the enrichener lever on the carburetor backplate. Dropped a screw. That’s not new. I drop things constantly (especially if it is the only one of a thing). I reached down to pick the screw up off the floor, and my hair – the one time it wasn’t in a pony tail – swung down and landed on top of my propane heater. Tssssssssss!!!!! Smell of burning hair and smoke. Several profanities later, put the fire out in my hair, found the stupid screw, and kept working. The good news is I have too much hair anyway, and it’s curly, so I did some clipping on it, and you can’t even tell.

But sometimes… The shovel wins. At a certain point, every little task I tried to complete went completely sideways. 
I tried putting the LED bulbs into the rear signals. A 10-minute job, at most. Until I couldn’t get the one incandescent bulb out. I broke it. Then it took about 45 minutes to pry the base out. I was actually sweating when I finally got it out. Then I couldn’t get the LED bulbs in. Great. Me: 0 Shovel: 1.

Later I sent them to Paul, who determined that someone along the way had changed the bulb bases out and the lights take a completely different style bulb, which – wait for it – is not made anymore. Of course. But at least it wasn’t me. The bulbs really were impossible to install. However, he found some random electrical supply house that had some of the incandescent bulbs left, so that’s what I’m running in them now. Over this next winter, I will convert those lights to LED.

After I fought a losing battle with the rear turn signals, I decided to put the new throttle cables on, and bolt up the new carb. Wow. That was a nice dream….
I did get the carb on. Finally. I started with the throttle cables. Figured out how to get those on. Even figured out which was the return cable, and where it went. I was pretty proud of myself. For like, a nano-second. Until I put the whole assembly on the bar, and it was all wonky and loose. Oh well, the cables were on, I could figure that out later, so I moved on to the carb. I’m all focused on getting the cables attached to the carb, and then realize, I didn’t route the cables first!!! So I had to take them off the carb, route them, then put them back on the carb. Best part? I forgot to make sure I noted how the old cable was routed. Seriously a dumb move on my part. But oh well. Me: 0, shovel: 2.
Moving on, I got the main cable out, no problem. But the return cable end popped DOWN instead of UP. Argh! I spent probably 45 minutes trying to finagle that bugger back into the right position so that I could try, again, to remove it. I’m not proud of myself. I lost it. I was sitting in my garage swearing, and swearing some more, panicking because what if I can’t get this stupid cable end out? (Like what is the worst that can happen? I need to get someone to help me?) Then I just took a breath. Picked up the carb again, barely touched the thing, and that cable end popped right back into place. WHAT??? Another little bit of tweaking, and out it popped! WHAT??? 
Then it looked like the cables were too long. Ugh.
So I started back on the throttle. I realize the left grip is too small for the left bar, but the right grip is fine. But I did figure out why everything was loose. All I had to do was slide the throttle tube farther into the grip. 
But that helps me, not at all, because my left grip won’t fit. 
With everything attempted, the score is me 1, shovel 3. Maybe 4.

Grips and throttle cable are happy. The carburetor is on, tanks are on, dash is on, for the first time, but not the last. Aluminum rocker boxes are cleaned up nicely with a 3M scrub pad.

This was not a good day for my psyche! Sadly, I am that person who likes to – maybe needs to – finish things. At that point, nothing was finished, and I was back to figuring out how to make them work. Furthermore, I really just wanted to accomplish something on my own, and I was working way over my head, or at least it felt that way. I felt so stupid always having to ask someone else to help me, or give me information. 
If this were a home improvement project, I would know my options, know what questions to ask, know my limits, know the pitfalls, know where to get what I need. But this was something I’d never done before, so it was pushing me hard. All my self-doubt, high expectations, high standards, lack of patience with myself – all of that was showing in this moment. But even then, I didn’t regret starting this project at all. I never once said to myself, ‘you should never have tried this.’ Well, maybe once. But I took it back. 

It turns out that I got stubborn about asking for help at the exact wrong time. Dan could have ordered me the correct left grip if he had known I needed the larger i.d. But, no, I took the grip to the shop where I work, and asked one of our lathe guys if he could remove just enough material to allow it to slip on. No simple task to remove material from the internal diameter of a rubber grip. But our guy pulled it off somehow. Success! Finally!!!
It slid right on. I thought a previous owner had welded a tube over the bar, but later found out through Dan, that Harley actually did it to use the same bar for kick and electric start bikes. Being a ’74, mine was a blend. The primary ignition is electric, but it does have a kicker on it “as a backup.” Regardless, strict kickers have a retard on the left bar, thus a smaller bar with a tube in the grip. Electrics didn’t have a retard, so the left bar took a grip with no tube. That’s why the grip didn’t fit. Forehead smack!
Sometimes you don’t know, what you don’t know…
I couldn’t quite figure out how the throttle cables should be routed, because the cable on the bike wasn’t stock – not helpful. So I visited Dan, who showed me a bone stock ’69. I was able to check out the correct routing, and got the cables on. Not without taking the cables on and off about four times, but the up side to that is that I am now pretty good at getting those buggers on and off the carb, and the throttle tube!

Meanwhile, the tanks and tins came back from paint (Todd Wilcox, Medina, NY), and I got all new hardware to attach the trim pieces.

After this, I got the spots and the switch for them wired in, and I also got the front turn signals installed and wired in. Another friend of mine used Dan’s sketch to get the starter, starter solenoid, starter relay and battery configuration figured out, and partially wired. I got the rear harness connected to the rear block, got it routed back through the fender strut, and added more protective loom to it. I also put the light bulbs in the dash, and put the dash gasket on as well.
We tested the spots and front turns and they worked! Holy moly, I almost cried. It was such a great feeling to see even a small bit of the work I’ve done come to life in the form of light

Another day, I got the 12v outlet installed so I can use GPS on the bike. Just because it’s an old bike, doesn’t mean I can’t use updated travel methods. After I got the outlet installed, I put a RAM Mount on my handlebar to hold my phone, and I picked up a good quality USB cable to connect the 12v outlet to my phone. Slowly, all the pieces and parts that have been stacked up in my house and garage, are making their way to their proper places on the bike.

But slowly is the operative word. I planned to have the bike done in plenty of time to ride it 230 miles to the AMCA Allegheny Mountain Chapter’s National Road Run (June 2019). Of course, no matter how much you plan, there are unforeseen delays. At this point, I was running out of time to get the bike done, dyno tested, and still have time to do some shakedown rides on it before taking it out of the area. So I started skipping the gym, not grocery shopping, not getting much sleep, barely getting laundry done. All I did was go to work and then work on the bike.   After a three-day thrash, Paul and I got the wiring done. I was over the moon. I got to see the whole bike put together. All the Atomic Age accessories. The new paint. The bubble bags I opted for instead of the shovel-style squared off bags. Everything. The bike was a thing of beauty!

Until…

When Paul and I were thrashing to get the bike done, we didn’t test everything as we completed circuits. We tested some circuits, but as it got later, and we were running on empty, testing went by the wayside. So I ended up with at least one short somewhere in the lighting that I wasn’t aware of till later when another friend, Bill Phillips, went to hook up the battery.

The bike was already scheduled to go out to Dan’s for him to dyno, and at least the ignition system worked, so Bill and I figured, we’d haul it out there, let him dyno it, then I’d chase down the lighting issues afterward. But I still had a couple days to work on it before it went to Dan’s. I pulled the entire front block off, shimmed it out because it seemed like it was grounding on the triple tree. I remounted it, and rewired it. I hoped, no, I prayed, that would fix the problem. Nope. Shovel: 1, me: 0. Again.
Nothing to do but take it to Dan as is, and figure it out later. Then the completely unexpected – over the next couple weeks, Dan let my shovel live in his shop on a lift, and I went out every evening and worked through all the bugs. He’d help me where I needed it, show me how to do certain things, let me struggle until I’d ask for help, laugh at me (a little) as I tried to figure out how to hold three things and still tighten down a nut, but best of all, he shared a lot of his little tricks and special tools he’s made or modified over his many years of tilting with shovelheads.
The only thing I couldn’t get done was installing the rear crash bars. I wasted 2-1/2 hours of precious time one night, trying to bolt them up, only to find so many clearance problems that it was impossible for the right bar to go on the bike. Luckily I started on the right side, so at least I didn’t have to take both bars off when I gave up. Turns out, the exhaust bracket isn’t a stock setup, and that was causing clearance problems. So the rear crash bars will have to wait and be installed in the off season when Dan can help me figure out the best plan of attack on them.

If nothing else, this project has taught me that just because you order a part that is supposed to fit your bike’s year/model, doesn’t mean it will. And if it is a re-pop part, your chances are even slimmer. Another thing I learned is that each delay you run into because you need a part, is a week. At least. Need switches? A week. Need a bracket, or lights? A week. And I am fortunate, because shovel parts are relatively easy to come by, compared to pan or knuckle parts.

However, I digress. Once I gave up on the rear crash bars, I found the last remaining short underneath the rear fender right away, so I spent the next 1/2 hour wrapping every single wire in electrical tape to make sure nothing was exposed. I. Mean. Nothing.  Since I had trouble with the rear turn signals, and they won’t hold the LED bulbs anyway, I will probably rewire the back of the bike again once the season ends. Then I can take a better run at it, and rewire the turn signals while I’m there.
But at least I had all the electrical gremlins are sorted. Everything worked. Finally.

Nothing Happens Fast on a Shovel – Part II

Down the Rabbit Hole – It Worked for Alice

So my ’74 FLH quite definitely has its own personality – stubborn, taunting, needy, greedy, difficult – we really are not friends, but we do have a working understanding. Kind of like the US and Russia during the Cold War. We either get along, or we could both go up in flames.

To back up just mite – before I actually started tearing the shovel down. I met Paul Greenwood (Greenwood’s Antique Motorcycles), who volunteered to help me/teach me to rewire the bike. He works mostly on panheads, and specializes in restoring lights for those bikes. Far be it from me to turn down an offer of help. It was difficult because Paul lives three hours away in Pennsylvania, but he helped out through messaging, and at critical points, he’d pop in for a weekend thrash on the bike.

When I started this project, I was just going to rewire the bike and put bags on it. Then I fell down the inevitable rabbit hole of “while I’m at it,” and “I’ll probably never have the bike this far apart again.” So I decided to replace the S&S B carburetor that had given me fits. This added to the overall price tag, but the S&S B carb was not the right carb for this bike, this motor, this rider.

I also decided to send the tanks and tins to paint, since they were off the bike anyway. It was a 45 mph paint job – as in, it looked great at 45 mph – but it needed enough work that it made more sense to just repaint. I stayed with black. The bike was not in original paint anyway; in fact, the tanks might not be original to the bike, and I suspect the fenders aren’t either, so I didn’t feel bad about this decision at all.

At this point, I started developing a vision for what I wanted the bike to look like. Some of my favorite bikes are the ones that have those interesting personal touches – unique, sometimes kooky accessories, additional lighting – things that as you walk past the bike, make you back up and look again at whatever caught your eye. Then you find all these other cool details now that the bike has your full attention. I’d found a “rocket” three-finned exhaust tip that gave me the idea to accessorize the bike in an Atomic era theme. The theme is carried through the bike with Paul’s suggestions for lighting. We added tailgunner lights with amber lenses to the front fender. I went with the correct turn signals, front and back. I kept the amber spots, but ended up replacing the one-piece bracket with two separate brackets, since the one piece bracket hit the top of the front fender. The front turn signals were hitting the front crash bar until I moved them to the new spotlight brackets, so that change fixed two clearance issues at once. In the end, the only lights that I kept on the bike from when I bought it were the amber spots, and the taillight.

The “Atomic” accessories that will decorate my FLH.

Aware of my theme, Paul found a couple unique pieces at a bicycle swap meet – a rocket hood ornament, and a red plastic headlight visor – that put the entire theme over the top, perfectly. I also found some little zeppelin shaped doodads, intended to be antenna toppers, at a swap meet in Asbury Park, NJ. Paul figured out how to put LED bulbs in them, and created this whole license plate assembly that combines an ElectraGlide badge, a couple nifty oversized reflectors, and the zeppelin lights. However, I was still a long way from seeing the entire bike as I envisioned it.

A sneak peek at the license plate assembly that Paul Greenwood cooked up for me.

In fact, I had many more struggles ahead of me, beginning with getting the handlebars wired. Dan had warned me about the re-pop switches that were available for shovelheads. He said they were difficult to solder, and even if I got them soldered, they wouldn’t work for long, and I’d be back into the handlebars again anyway. He was not wrong. However, at the time we had this conversation, I don’t think he knew of any good alternative except replacing the entire housing, and I didn’t want to do that. So I bravely ordered the re-pop switches, got all my soldering supplies together, and set up on my work bench in the basement. I started with the rocker switch. That went pretty quickly, so I was all proud of myself, and moved on to the pushbutton switches. Every time I tried to solder to the switch, the plastic part would melt. So after some extreme frustration, and a whole lot of swearing, I gave up. I’d spent an entire day on this, and got one lousy switch rocker wired.
So I regrouped, did some checking, and found that the switches were available with wires already soldered in place. Ok! Problem solved. Order those, splice those babies in, and I’m good. I also read that they should be soldered with no more than a 20v gun. Mine was 30v. I couldn’t find a 20v, but I found a 15v, and got that. I was also told to try thinner solder. I only had the one roll of solder they sell at AutoZone, so I got thinner solder. I was READY!!!
Except.
When the new switches came in, the solders on them were sketchy. A few were loose, but I’d ordered 2 extra, just in case. I went ahead and got new rocker switches too. One was backordered, and the other one came in wired backwards. I wasn’t going to use it, till I realized that the one switch I’d successfully wired the previous week… didn’t actually work. It was frozen up. How did I not check that?? So I replaced that rocker with the new one, once I rewired it correctly, and I checked the other original rocker I had, and it worked, so I was still ok.
Except.
As I was putting in the new switches, I reinforced the soldered connections with heat shrink… Annnnd melted the plastic tip with the heat gun. Would this never end?
I finally got all the switches wired, ruined two in the process – good thing I ordered two extra – but I really didn’t trust them. I had a feeling that Dan’s warning would prove correct – they might work for a little while, and then they would start breaking. They are absolute junk. Shame on the companies who sell these. 
Meanwhile, Dan found a switch that he thought would work. He gave me one to see how it fit in the housing. It was close, but the housing needed to be modded slightly in two ways to accept the larger diameter of the switch. Fortunately, I work at a machine shop, so the owner, Walt Przybyl (who owns PRZ Technologies, and is co-crew chief on an NHRA nitro dragster) modded the two housing for me. Not as simple as it sounds – first off, he had one shot to get it right – I certainly didn’t have any backup 1974 FLH switch housings if he screwed one up. And the housings were awkward to hold without distorting them since they are aluminum. But he made it happen.
It is appropriate that I was doing this in February, because wiring the handlebar switches was quite the Groundhog Day situation. It took one month, three sets of switches, two soldering guns, two sizes of solder and a switch housing modification to make it happen. Along with the help of three people to get four switches successfully wired. But it happened.

Low quality aftermarket switches – a hot mess to attempt to wire.
Successful re-use of the rocker switch, or so I thought….
The right switch housing with the cheap plastic switches. Attempts #1 and 2 were with these switches.
My Clymer’s diagram and one successfully wired housing.
The stainless steel switches installed in the modified housings. I had to use a 3M pad to blend the aluminum after it was machined.
Switches and housings installed on the bar. Finally!

Sometimes, in the learning process, you “waste” time doing something wrong, or dealing with materials issues, but you learn. I was pretty frustrated that I had to order three sets of switches for the bars, take out part of the wiring I’d already done, and redo it. But that’s what it took. And the crazy part is that I actually enjoyed this whole process. Not the frustration, and the self-doubt, but the fact that I was learning something new. I was doing pretty OK with it, and I had really good people helping me along the way.

My goal, by this time was to have the switches wired, housings back together, and everything tied in to the front block. I was also supposed to have the neutral switch installed and connected. None of this happened on schedule – another theme of this project – don’t plan to finish anything when you plan to finish it. It will get done, when you get it done – or more accurately, when the bike allows it to be done – and no earlier. 

Once I finally got the handlebars wired, Paul came up to start pulling everything back together. He brought a panhead front block to use, since the one on my bike was just sort of floating behind the headlight, and there was no good way to secure it to the triple tree. So that was a huge weekend of progress. We changed the front block out, and wired in the handle bars. We also finished wiring in the dash, and put the oil tank back in.

Dan recommended a module to wire in to my turn signals. It gives me self-canceling signals and hazards, which made me quite happy, since the shovelhead turn signals aren’t off/on. To make them flash, you have to hold the button in. Holding the button in, plus managing throttle and brake or clutch seemed, well, dumb. So this module was just the ticket. After this productive weekend, I had a list of stuff to get done before another push on the wiring. I pulled the S&S B carb off, replaced quite a few rusty fasteners, and made gaskets for the tailgunner lights. 
I got the spots put together. These were on the bike when I bought it – re-pops. When I took them apart and then tried putting them back together, I realized the finish ring didn’t seat correctly. Big surprise. Does any re-pop part ever really fit? Paul told me to just open up the bucket a little until the ring seated, so I got that done, and reassembled them with the Spacely Sprockets decorative covers. These were the first of the Atomic accessories to go on the bike. A few steps forward, but sometimes, the shovel wins, as you will see in Part 3.

Nothing Happens Fast on a Shovel – Part I

Can We Be Friends?

About three years ago (2016), I bought a 1974 FLH that looked pretty good, overall, but was obviously rough around the edges, to say the least. It terrified and intrigued me all at the same time. It was tough to ride – very mechanical and beasty – it wouldn’t hold idle, it had an exhaust leak, none of the dash lights worked. Turn signals? Nope. I think the only lights that worked on the bike were the headlight and brake light. There had been many hands on this bike over its lifetime, and they didn’t seem to be connected to brains – that was pretty obvious by the mess the bike was in.

I wanted to ride this bike, but it was pretty sketchy, and in the first few months I had it, it left two large puddles on my garage floor right under the front forks. So the bike pretty much sat in my garage. I would look at it, tell myself to sell it because I’d never get it running, then I’d not sell it because there was something about it that I – loved? Wanted? Needed?

My 1974 FLH as it sat when I bought it. 45 mph paint, exhaust leak, and host of other issues, but it was mine.

Finally in September 2018, I decided to get the front forks done. I rode the bike out to Dan Thayer in Corfu, NY (Thayer Sales & Service). He got another bike of mine running great, so I asked him about my shovel. In a move that he possibly regrets, he told me to bring it on out to him.

So Dan did the forks for me, and I rode the beast home. On the way home, the right rear turn signal, which was mounted to the fender strut, loosened up and was hanging by its wire. Sigh. I wanted to put bags on the bike, and the rear signals were going to have to move anyway. As I started taking stock of just how much of the electrical on the bike did not work, it made sense to me to just rewire the bike.

As I stood in my garage, staring at this beast, with its drooping taillight mocking me, I decided that I was going to rewire it myself. Me. No mechanical experience whatsoever, beyond changing the fluids in my modern bikes, which I had just learned to do. Yeah, that me. But I also knew that if I wanted to ride this bike, or any old bike, I would need to know a whole lot more about bikes in general than just press a start button and go. Clearly what I lack in knowledge, I also lack in common sense.

I talked to a few people about it, including Dan Thayer, and I’m certain they all figured I’d start, give up, and either never ride the bike, or haul it to someone to finish. I have to admit, I had a little voice whispering the same thing in my ear. But I went for it. I really had nothing to lose, and everything to gain, because even if I totally screwed it up, I would learn something. Right?

So I found a used Harbor Freight lift on Craigslist and dragged it home. Some friends helped me get the bike up on it and strapped it down for me, and I started tearing the bike down. I wasn’t even sure how far I was going to have to go, but I ended up basically going right down to the frame. Instead of bagging and labeling the fasteners, most of the time, I just put them back where they came out of. I knew I’d never remember what my descriptions on the bags would mean later. This was the first of many times that I, or someone else, had to save me from myself.

The FLH up on my used Harbor Freight lift, waiting for me to find the courage to start tearing it down.

One of my FaceBook posts from this time sums it up pretty well. “Venturing into the unknown, doing what seems like a huge project to me, hoping I don’t screw it up beyond repair, hoping I don’t open a larger can of worms… Step 3 in shovel rewire: Remove everything that covers a wire or contains one (or more). Repeat until there is nothing else left to remove.”

Once I got the bike pretty much stripped down, I degreased it (again) – a chore that seemed to repeat itself periodically because the frame and all the mechanicals were just caked with grease and dirt. I have degreased that bike probably 4-5 times, and I still find places that I missed.

When I exposed the main harness underneath the tanks, every single wire in the dang harness already had a splice in it – apparently a previous owner had rewired the bike once already, and did a cob job on it. No wonder nothing worked right. The further into this I got, the more it becomes obvious that I made the right call by doing a complete rewire.

After the teardown. I am terrified, but excited to see what kind of mess I can make of this.

At this point I was all in. There was no turning back. I was fully committed to this bike. I was terrified. But pretty proud of myself for even getting this far. And I was learning many things:

  • How to read electrical schematics. Sort of.
  • That you can’t reach that little nut waaay back there without taking something else off the bike, so don’t even try. OK, try, but stop before busted knuckles happen.
  • That I still need more tools, even with the two tool boxes and pegboard full.
  • That you need to wear two pairs of socks to keep your toes from freezing when it’s 25 degrees out.
  • And, finally, that I needed a better heater in the garage.

But the biggest things I learned were that (A) I’m pretty lucky, and (B) I’m pretty dumb. In one of my weekend thrashes, I didn’t put the straps back on the bike. It was fine for a few days, but one day, I came home from the gym, and there was my bike – lolling on her side, looking sad.

The day before, I had just pulled all the trim off the fenders and sat them on the floor beside the bike. By some small miracle, the bike just missed smashing the tins when it fell. 
I snapped a pic so I’d never forget to strap the bike again. Then I grabbed the frame and heaved her upright. But the bars were turned, the rear tire was right of center of the lift, and I was, well, stuck. Didn’t think that one through. So I can’t let go of the bike, and I can’t get it secured. I think, oh no, where is my phone? Cold sweat. Please, oh please! Let it be in my pocket where I can reach it. Fortunately, it was, so I start calling a couple friends – no answer. No answer. No answer. Feeling just a little desperate, I hit up my boss and he answered! He was about 5 minutes away, so I stood there in my freezing garage, holding the bike till he got there. In about 2 minutes, he had it straight on the lift, and we strapped it down. Lesson learned. Very thankful to be as lucky about that as I was. 
Bonus: I think I set a new deadlift PR (personal record) as well.

At that point, the tenor of my relationship with this bike had been set. The bike would allow me to get something right every once in a while with relative ease. Then it would give me the giant middle finger, and I’d have to wrestle it to the mat to get one little thing accomplished. Other times, I would simply screw myself, unwittingly. And so it goes.

Sometimes people have to save you from yourself.

The Atomic Shovel: The Life and Times of a 1974 FLH

The shovelhead in these posts was my first old bike, and my first adventure into working on a bike. That bike has been a teacher of sorts. Over the days, weeks and months that I worked on it, and worked with other people on it, the bike taught me more about patience, process, and people.

These blogs first appeared as regular posts on my Facebook page, and they were so well-liked (literally), that I decided to put it all up as a blog once I was done with the bike. Although, I am not really done with the bike. It will never be completely done, done. Currently, it is back on a lift, out at Dan’s, getting a motor rebuild.

I also had to fix a few electrical gremlins, again, mostly due to the excessive vibration the bike had. Now that it is apart, it seems the flywheels were pretty badly out of balance, so that explains the shaking “like a wet dog” – as I would describe it.

However, the blog is still fairly entertaining if you enjoy reading someone else’s trials, and you are into bikes. At least I’d like to think so.