Down the Rabbit Hole – It Worked for Alice
So my ’74 FLH quite definitely has its own personality – stubborn, taunting, needy, greedy, difficult – we really are not friends, but we do have a working understanding. Kind of like the US and Russia during the Cold War. We either get along, or we could both go up in flames.
To back up just mite – before I actually started tearing the shovel down. I met Paul Greenwood (Greenwood’s Antique Motorcycles), who volunteered to help me/teach me to rewire the bike. He works mostly on panheads, and specializes in restoring lights for those bikes. Far be it from me to turn down an offer of help. It was difficult because Paul lives three hours away in Pennsylvania, but he helped out through messaging, and at critical points, he’d pop in for a weekend thrash on the bike.
When I started this project, I was just going to rewire the bike and put bags on it. Then I fell down the inevitable rabbit hole of “while I’m at it,” and “I’ll probably never have the bike this far apart again.” So I decided to replace the S&S B carburetor that had given me fits. This added to the overall price tag, but the S&S B carb was not the right carb for this bike, this motor, this rider.
I also decided to send the tanks and tins to paint, since they were off the bike anyway. It was a 45 mph paint job – as in, it looked great at 45 mph – but it needed enough work that it made more sense to just repaint. I stayed with black. The bike was not in original paint anyway; in fact, the tanks might not be original to the bike, and I suspect the fenders aren’t either, so I didn’t feel bad about this decision at all.
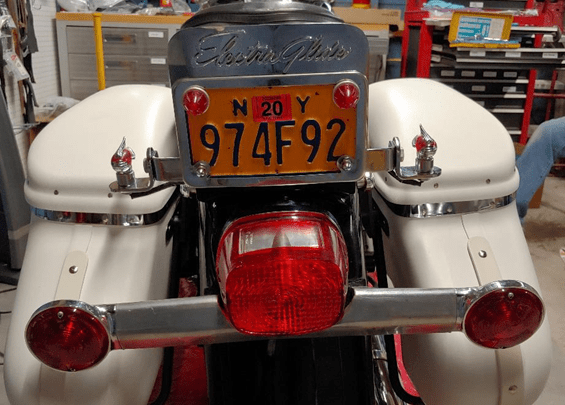
At this point, I started developing a vision for what I wanted the bike to look like. Some of my favorite bikes are the ones that have those interesting personal touches – unique, sometimes kooky accessories, additional lighting – things that as you walk past the bike, make you back up and look again at whatever caught your eye. Then you find all these other cool details now that the bike has your full attention. I’d found a “rocket” three-finned exhaust tip that gave me the idea to accessorize the bike in an Atomic era theme. The theme is carried through the bike with Paul’s suggestions for lighting. We added tailgunner lights with amber lenses to the front fender. I went with the correct turn signals, front and back. I kept the amber spots, but ended up replacing the one-piece bracket with two separate brackets, since the one piece bracket hit the top of the front fender. The front turn signals were hitting the front crash bar until I moved them to the new spotlight brackets, so that change fixed two clearance issues at once. In the end, the only lights that I kept on the bike from when I bought it were the amber spots, and the taillight.
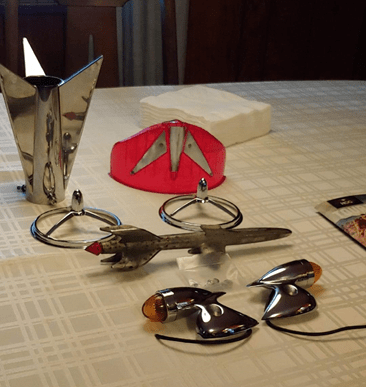
Aware of my theme, Paul found a couple unique pieces at a bicycle swap meet – a rocket hood ornament, and a red plastic headlight visor – that put the entire theme over the top, perfectly. I also found some little zeppelin shaped doodads, intended to be antenna toppers, at a swap meet in Asbury Park, NJ. Paul figured out how to put LED bulbs in them, and created this whole license plate assembly that combines an ElectraGlide badge, a couple nifty oversized reflectors, and the zeppelin lights. However, I was still a long way from seeing the entire bike as I envisioned it.
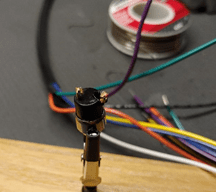
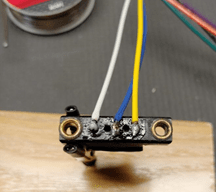
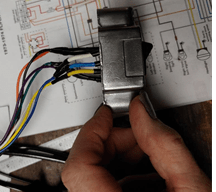
In fact, I had many more struggles ahead of me, beginning with getting the handlebars wired. Dan had warned me about the re-pop switches that were available for shovelheads. He said they were difficult to solder, and even if I got them soldered, they wouldn’t work for long, and I’d be back into the handlebars again anyway. He was not wrong. However, at the time we had this conversation, I don’t think he knew of any good alternative except replacing the entire housing, and I didn’t want to do that. So I bravely ordered the re-pop switches, got all my soldering supplies together, and set up on my work bench in the basement. I started with the rocker switch. That went pretty quickly, so I was all proud of myself, and moved on to the pushbutton switches. Every time I tried to solder to the switch, the plastic part would melt. So after some extreme frustration, and a whole lot of swearing, I gave up. I’d spent an entire day on this, and got one lousy switch rocker wired.
So I regrouped, did some checking, and found that the switches were available with wires already soldered in place. Ok! Problem solved. Order those, splice those babies in, and I’m good. I also read that they should be soldered with no more than a 20v gun. Mine was 30v. I couldn’t find a 20v, but I found a 15v, and got that. I was also told to try thinner solder. I only had the one roll of solder they sell at AutoZone, so I got thinner solder. I was READY!!!
Except.
When the new switches came in, the solders on them were sketchy. A few were loose, but I’d ordered 2 extra, just in case. I went ahead and got new rocker switches too. One was backordered, and the other one came in wired backwards. I wasn’t going to use it, till I realized that the one switch I’d successfully wired the previous week… didn’t actually work. It was frozen up. How did I not check that?? So I replaced that rocker with the new one, once I rewired it correctly, and I checked the other original rocker I had, and it worked, so I was still ok.
Except.
As I was putting in the new switches, I reinforced the soldered connections with heat shrink… Annnnd melted the plastic tip with the heat gun. Would this never end?
I finally got all the switches wired, ruined two in the process – good thing I ordered two extra – but I really didn’t trust them. I had a feeling that Dan’s warning would prove correct – they might work for a little while, and then they would start breaking. They are absolute junk. Shame on the companies who sell these.
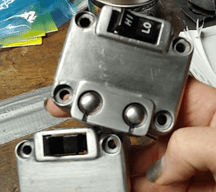
Meanwhile, Dan found a switch that he thought would work. He gave me one to see how it fit in the housing. It was close, but the housing needed to be modded slightly in two ways to accept the larger diameter of the switch. Fortunately, I work at a machine shop, so the owner, Walt Przybyl (who owns PRZ Technologies, and is co-crew chief on an NHRA nitro dragster) modded the two housing for me. Not as simple as it sounds – first off, he had one shot to get it right – I certainly didn’t have any backup 1974 FLH switch housings if he screwed one up. And the housings were awkward to hold without distorting them since they are aluminum. But he made it happen.
It is appropriate that I was doing this in February, because wiring the handlebar switches was quite the Groundhog Day situation. It took one month, three sets of switches, two soldering guns, two sizes of solder and a switch housing modification to make it happen. Along with the help of three people to get four switches successfully wired. But it happened.
Sometimes, in the learning process, you “waste” time doing something wrong, or dealing with materials issues, but you learn. I was pretty frustrated that I had to order three sets of switches for the bars, take out part of the wiring I’d already done, and redo it. But that’s what it took. And the crazy part is that I actually enjoyed this whole process. Not the frustration, and the self-doubt, but the fact that I was learning something new. I was doing pretty OK with it, and I had really good people helping me along the way.
My goal, by this time was to have the switches wired, housings back together, and everything tied in to the front block. I was also supposed to have the neutral switch installed and connected. None of this happened on schedule – another theme of this project – don’t plan to finish anything when you plan to finish it. It will get done, when you get it done – or more accurately, when the bike allows it to be done – and no earlier.
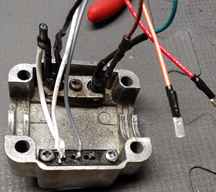
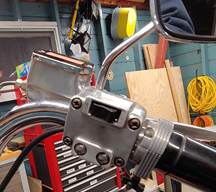
Once I finally got the handlebars wired, Paul came up to start pulling everything back together. He brought a panhead front block to use, since the one on my bike was just sort of floating behind the headlight, and there was no good way to secure it to the triple tree. So that was a huge weekend of progress. We changed the front block out, and wired in the handle bars. We also finished wiring in the dash, and put the oil tank back in.
Dan recommended a module to wire in to my turn signals. It gives me self-canceling signals and hazards, which made me quite happy, since the shovelhead turn signals aren’t off/on. To make them flash, you have to hold the button in. Holding the button in, plus managing throttle and brake or clutch seemed, well, dumb. So this module was just the ticket. After this productive weekend, I had a list of stuff to get done before another push on the wiring. I pulled the S&S B carb off, replaced quite a few rusty fasteners, and made gaskets for the tailgunner lights.
I got the spots put together. These were on the bike when I bought it – re-pops. When I took them apart and then tried putting them back together, I realized the finish ring didn’t seat correctly. Big surprise. Does any re-pop part ever really fit? Paul told me to just open up the bucket a little until the ring seated, so I got that done, and reassembled them with the Spacely Sprockets decorative covers. These were the first of the Atomic accessories to go on the bike. A few steps forward, but sometimes, the shovel wins, as you will see in Part 3.
